Products:
- https://www.optics-trade.eu/en/swarovski-x5-3-5-18×50-p.html
- https://www.optics-trade.eu/en/swarovski-x5-5-25×56-p.html
1. DESCRIPTION
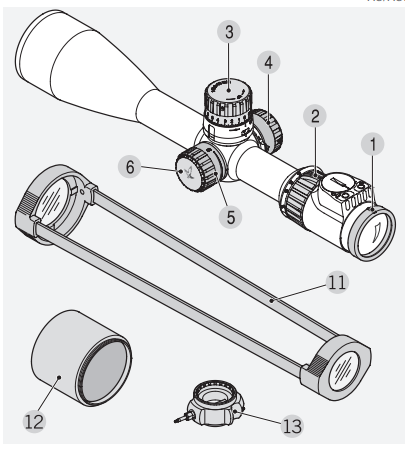
- 1 Dioptric correction
- 2 Magnification adjustment ring
- 3 Removable top turret cap
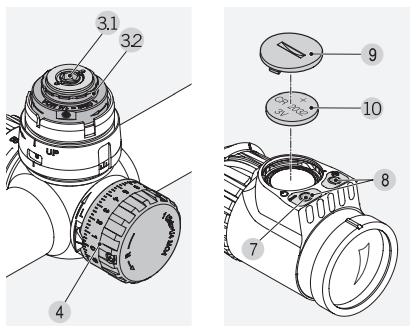
- 3.1 Top turret
- 3.2 Zero point adjustment
- 4 Removable side turret cap
- 5 Parallax turret
- 6 Replacement battery cover
- 7 On/Off switch
- 8 Brightness control for reticle illumination +/-
- 9 Battery cover
- 10 Battery for reticle illumination (button cell CR 2032)
- 11 Transparent scope covers
- 12 Sunshade
- 13 Multi-tool
2. MULTI-TOOL

- 1. Torx screwdriver
- 2. Allen key
- 3. This opening on the multi-tool is used when sighting the riflescope. Use it to turn the ring on the top turret until it reaches the stop. (See also Section 4.4 Elevation adjustment)
- 4. There is a coin opener on both sides of the multi-tool.
- 5. The large grooved opening on the multi-tool is used to open the replacement battery cover.
3. OPERATION
3.1 ADJUSTING THE FOCUS
Simply turn the dioptric correction ring to achieve the best focus for your individual setting of the reticle. First turn the dioptric correction ring all the way to the left (counter-clockwise) and then to the right, until the reticle is optimally focused.

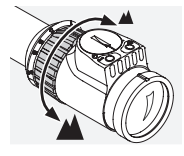
3.2 CHANGING THE MAGNIFICATION
You can set the desired magnification by turning the (stepless) magnification adjustment ring through 180°. The scale on the adjustment ring allows simple and easy reading of the setting. The soft, ribbed covering of the adjustment ring has a nose for better orientation.
3.3 THE RETICLE IN THE 2nd IMAGE PLANE (EYEPIECE IMAGE PLANE)

If the magnification increases, then the reticle remains the same size – the size of the image is increased but not the size of the reticle. Even for large magnifications only a little of the target is covered. The reticle can only be used for estimating the distance to a limited extent.
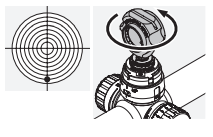
3.4 OPERATION OF THE PARALLAX TURRET
Using the parallax turret, you can adjust the optimum focus for every target distance thus preventing aiming errors due to parallax. The parallax turret can be set from 50 m to infinity.
Set the magnification as high as possible and turn the parallax turret until the image appears at its sharpest. Now move your eye from side to side within the range of the exit pupil. If the reticle moves off the target correct the parallax setting until the reticle stops moving against the target.
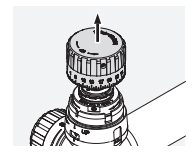
3.5 OPERATING THE TOP TURRET
1. Sight-in distance (zero position)
The top turret can be set to a zero stop position.
2. Rotation indicator
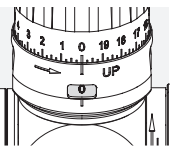
The viewing window allows you to easily see which rotation you are on.
3. SUBZERO
The top turret can be used to go below the sight-in distance (40 clicks at an impact point correction of 1/4 MOA and 80 clicks at 1/8 MOA). Turn the turret clockwise to the zero position (sight-in distance), lift up the rotation indicator ring on the side openings of the top turret and then continue to turn the turret clockwise.
Note:
After going below the sight-in distance, turn the turret back to zero again and press the rotation indicator ring down again.
3.6 OPERATING THE SIDE TURRET
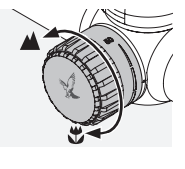
By turning the side turret clockwise or counterclockwise you can correct the rifle scope for windage adjustments.
3.7 OPERATION OF THE RETICLE ILLUMINATION
1. On/Off switch
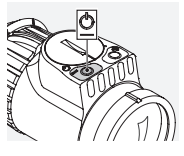
To turn on the reticle illumination, press down the minus button (left-hand button) for half a second.
2. Brightness control

Once the reticle illumination is turned on, you can now adjust the brightness by means of the +/– button and select the setting of your choice from among 10 brightness levels. You can make fine adjustments by pressing the buttons once (individual pulse).
3. Switching off

To turn off the reticle illumination, press down the minus button (left-hand button) for a second.
4. Memory function
When the reticle illumination is turned on again, the last brightness setting will be automatically activated.
5. Automatic turn-off function
If you haven’t adjusted the brightness setting within 3 hours the reticle illumination automatically turns off.
6. Battery power indicator
If the illuminated reticle begins to flash, this signifies that a battery change will soon be needed. The remaining operating time will be a few hours, depending on the brightness adjustment and ambient temperature.
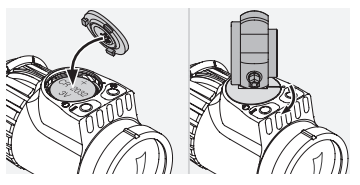
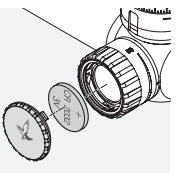
7. Changing the battery
- Turn off the reticle illumination.
- Using the enclosed multi-tool, please unscrew the battery cover in a counterclockwise direction. After a quarter turn, the cover will lift out of its mounting as it turns and you can remove it easily.
- Remove the old battery.
- When inserting the new battery (type CR 2032), please make sure that the side marked “+” is facing upwards.
- Replace the battery cover by matching the two markings (slot on the exterior of the lid, dot on the rifle scope) and then close it by turning it clockwise a quarter turn.
Note:
The last brightness setting stored will be lost when the battery is changed. When turned on, the illumination unit will revert to brightness setting 9.
8. Replacement battery in the parallax turret
Use the multi-tool to open the cover of the parallax turret.
The replacement battery is under the cover.
Batteries
Batteries should not be disposed of in household garbage. For this reason, you are legally obliged to return used batteries. You can dispose of them near your home (e.g. at your retailer or at municipal collection points) free of charge. Batteries are marked with a symbol of a crossed-through garbage container as well as the chemical symbol of the hazardous substance, thus “Cd” for cadmium, “Hg” for mercury and “Pb” for lead. Please help us to protect our environment from damaging pollutants.
9. Battery operating hours
Consult the technical data sheet enclosed!
10. Conformity
Appliances with an illumination unit comply with the EU Directives 2004/108/EU and 2011/65/EU.
3.8 MOUNTING THE SUNSHADE
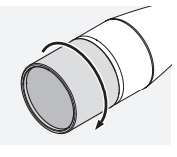
Screw the supplied sunshade into the lens filter mounting thread. If required, you can also screw on two sunshades after each other or attach other accessories (e. g. lens cover).
4. SIGHTING THE RIFLE SCOPE IN
4.1 BASIC ALIGNMENT
To ensure perfect alignment of the scope to the rifle, please have a competent gunsmith mount the scope. The reticle has been factory-set to the mechanical middle position.
Note:
When mounting the rifle scope onto the rifle, please make sure that you comply with the eye relief specified (see technical data sheet).
4.2 ALIGNMENT OF THE SCOPE TO THE RIFLE
If the point of impact of the bullet deviates from the aiming point, this can be easily and precisely corrected by adjusting the elevation turret and the windage turret of the scope. Regardless of corrections, the middle point of the reticle always stays in the middle of the field of view.
4.3 PREPARATIONS FOR SIGHTING THE RIFLE SCOPE IN
Before sighting the rifle scope in, please make sure that the following parameters are set correctly: – Parallax – Diopter adjustment – Level of magnification.
4.4 ELEVATION ADJUSTMENT
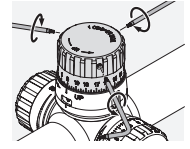
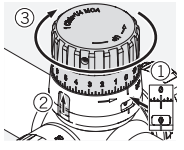
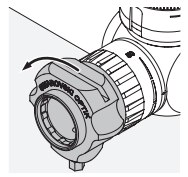
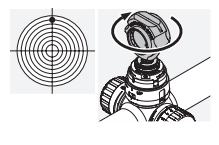
1. Use the Torx screwdriver to loosen the three grub screws that are securing the marked removable cap on the top turret.
Note:
Do not unscrew the grub screws completely so that you do not lose them.
2. Remove the cover.
3. Loosen the next three grub screws on the top turret.
4. Turn the Allen key in the middle of the top turret …
a) … counterclockwise when a shot is low or
b) … clockwise when a shot is high for the required impact point correction (1/4 MOA or 1/8 MOA – see markings on the top turret).
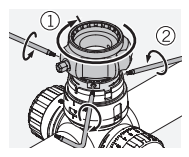
5. Place the multi-tool on the top turret and turn the turret clockwise until it reaches the stop.
6. Hold the multi-tool in this position with one hand. With the other hand, screw in the three grub screws evenly on the top turret, initially very lightly, then follow up by screwing them in tightly.
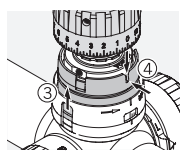
7. Lift up the rotation indicator ring, replace the cap onto the top turret and set the zero position on the notch.

8. Then secure the removable cap by lightly screwing in the three grub screws and then follow up by screwing them in evenly and tightly.
9. Push the rotation indicator ring down again.
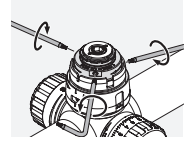
4.5 SIDE ADJUSTMENT

1. Turn the side turret …
a) … counterclockwise for a shot to the left or

b) … clockwise for a shot to the right for the required impact point correction (1/4 MOA or 1/8 MOA – see markings on the side turret).
Note:
If one turn is not enough to make the correction, loosen the three grub screws on the side turret using the Torx screwdriver supplied, turn the turret in the opposite direction to the previous adjustment until it reaches the stop and then tighten the screws again evenly. Then continue correcting in the required direction and repeat this procedure if necessary.

2. Once the correct adjustment has been made, loosen the three grub screws on the side turret using the Torx screwdriver.

3. Turn the turret until it matches the zero position on the rifle scope.
4. Then secure the removable cap by tightening the three grub screws lightly and then follow up by screwing them in evenly and tightly.
You will find the impact point correction per click on the enclosed technical data sheet or written on the elevation adjustment or side adjustment of your rifle scope.
4.6 TIPS AND TRICKS FOR MOUNTING RIFLE SCOPES
Nowadays, there is an enormous choice of technically advanced rifle scope mounts which allow rifle scopes to be attached securely to firearms. By using the right tools and amount of effort, desired levels of stability and accuracy can be achieved. Please read the installation instructions provided by the individual manufacturer carefully. These contain detailed information about the appropriate tool to use and a few tips and tricks to make installation easier.
Here are a few examples:
- Depending on the type of mount (please read the particular manufacturer’s instructions), when fitting the mount base it may be helpful to remove the finish from the contact surfaces, then degrease them and, when screwing the contact surfaces into place for the final time, first coat them with a suitable adhesive.
- If necessary, you could readjust the rings to make sure that the fitting is perfectly centred, e.g. by lapping the rings.
- Also degrease the clamping surfaces and inner sides of the rings and apply a suitable adhesive to at least the lower halves of the rings for complete stability when shooting.
- Please take particular care when adjusting the reticle.
- Eye relief distance: The correct eye relief distance for the rifle scope can be found in the technical information section. Individual settings and adjustments allow users to achieve an optimum field of view and a comfortable firing position.
- Torque: Tighten the screws for the rings on both sides to a maximum 200 Ncm. This ensures that the tubular bodies are not placed under unnecessary pressure and guarantees accurate, tension-free installation. To obtain the right amount of force, a torque wrench is recommended. Under no circumstances should the rings be tightened instead of sticking together the bottom halves of the rings, which is an essential step.
If the right tools are used with the right amount of force and the manufacturer’s instructions are followed closely, the rifle scope should require little correction when focusing in to shoot. Use the individual components to obtain the highest levels of accuracy for your chosen firearm/mount/ rifle scope combination. SWAROVSKI OPTIK provides no guarantee that the content of this page is correct, current or complete.
4.7 PXC PERSONALIZED EXTREME CAM
SWAROVSKI OPTIK has developed a personalized extreme cam (PXC) for all X5/X5i rifle scopes.
4.8 FURTHER INFORMATION
You will find detailed information and tips at: WWW.SWAROVSKIOPTIK.COM
5. MAINTENANCE AND CARE
5.1 LENS-CLEANING CLOTH
The special microfibre cloth can be used to clean even the most sensitive glass surfaces. It is suitable for objective lens, eyepieces and spectacles. Please keep the microfiber cloth clean as dirt particles can damage the lens surface. If the cloth is dirty, it may be washed in lukewarm soapy water and allowed to dry naturally. Please use it exclusively for cleaning lens surfaces.
5.2 CLEANING
We have designed all elements and surfaces to require very little care. The SWAROCLEAN nonstick outer surface coating makes it much easier to clean objective lenses and eyepiece lenses, especially of any dried-on mineral deposits (e.g. water marks from condensation), insect repellents and tree resin. To ensure the long-lasting optical brilliance of your rifle scope, you should keep the glass surfaces free from dirt, oil and grease. To clean the lens, first remove larger particles with an optical lens brush. For the subsequent thorough cleaning we recommend breathing lightly onto the lens and then cleaning it with the moist cleaning cloth. It is recommended to clean the metal parts with a clean, soft cleaning cloth.
5.3 STORAGE
You should keep your rifle scope in a well-ventilated, dry, dark place. If the rifle scope is wet, it must be dried prior to storage.
6. FOR YOUR SAFETY
6.1 WARNING!
Never use the rifle scope to look at the sun! This will lead to damage to your eyes! Please protect your rifle scope from unnecessary solar radiation.
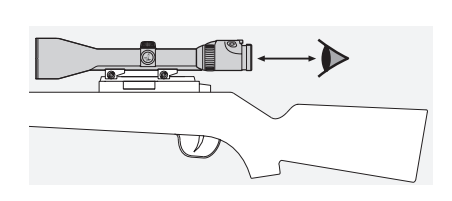
Please note the eye relief distance specified for a mounted rifle scope (see Data Sheet for dimensions).
6.2 GENERAL INFORMATION
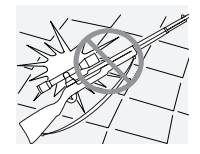
Please protect your rifle scope against knocks.

Repair and service work shall only be carried out by either SWAROVSKI OPTIK Absam (Austria) or SWAROVSKI OPTIK North America and any work by non-authorised parties shall render the warranty void.
6.3 SEALING
Thanks to the use of high-quality sealing elements and controlled fabrication processes, our rifle scopes are watertight and gas-tight to a pressure of 0.4 bar or a depth in water of 4.4 yds/4 m. Seal integrity is guaranteed even when the cap has been removed. Nevertheless, careful handling is advised, especially around the turrets. The scope has been filled with inert gas via the sealing screw located underneath the windage adjustment turret. Please do not loosen this sealing screw or the cover on the underside of the instrument!
7. PATENTS
SWAROVSKI OPTIK patents pending USA:
- Spring retention system
- Rotation indicator
- SUBZERO function
All details are typical values.
We reserve the right to make changes regarding design and delivery.
We accept no liability for printing errors.


