Product: https://www.optics-trade.eu/en/docter-comfort-1-4×24.html
This text is a transcription of the file in PDF format.


• Attention
Directly watching the sun through a binocular can lead to eye injuries due to a
strong concentration of rays of light, thus, it is to be absolutely avoided.
Please note when disposing of sighting mechanisms with electronic parts:

Please note when disposing of batteries of sighting mechanisms:

General Information
DOCTER® comfort riflescopes are brilliant target optics of state-of-the-art design.
Solid workmanship, high optical performance, attractive design and functional reliability
also in extreme weather conditions will make your DOCTER®comfort riflescopes indispensable for you.
Scope of delivery
• 1x transparent protective cap
• 2x battery CR 2032
• user manual
• warranty card
Technical Data

Commissioning
Inserting Batteries
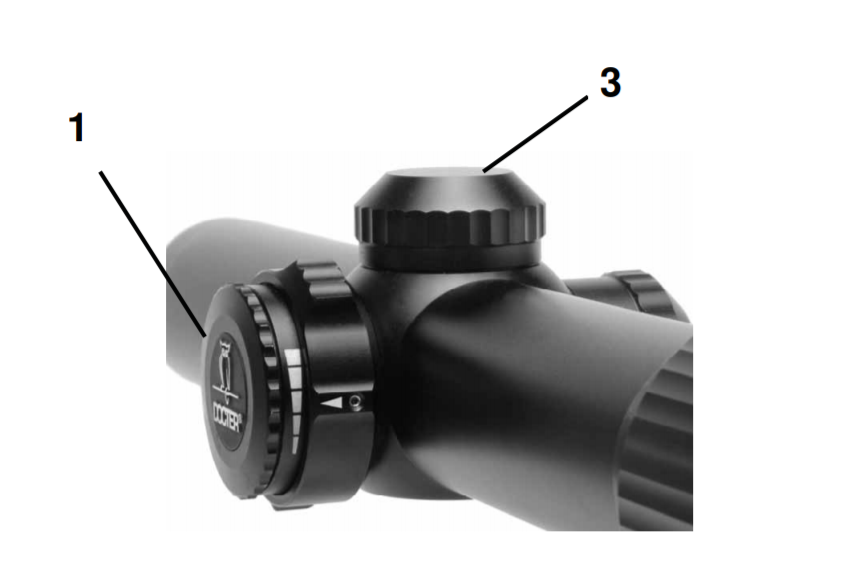
First, unscrew the battery compartment cap (1). Then, put the lithium battery CR2032
(scope of delivery) on the battery compartment with the positive terminal facing up, before pressing down in the middle or rather click it in. The lettering of the button cell must
be readable. Afterwards, the battery compartment cap (1) has to be screwed on again to
ensure a reliable electrical contact and the tightness of the battery compartment.
Removing Batteries
First, unscrew the battery compartment cap (1). Now you can remove the button cell by
pressing on the edge of the cell until it clicks and stands out slightly.
Switching the Reticle Illumination On/Off
It is not intended for the reticle illumination to be switched on manually. When the riflescope is in operational position, the illumination is automatically switched on. It automatically switches off when the position angle become smaller or larger than the critical angles as the weapon cants or is put down. As seen in the illustration …, the critical angle
is 45° for lateral canting as well as upward, and 75° downward.
Thus, the device is switched off during the typical vertical storage in a gun safe. Furthermore, the control is battery-conserving when the ambient light is very low, like in a
gun case, even if it is not switched off.

Brightness Control of the Reticle Illumination
The DOCTER® comfort riflescope is equipped with automatic illumination control. Thus,
the reticle intensity automatically adjusts to ambient light conditions. Readjusting the
illumination intensity, for example during twilight, is not necessary. However, if the default brightness is not satisfactory for the personal sensation, it is possible to readjust
manually. For that purpose, rotate the adjusting ring (2) upwards, as viewed from the
eyepiece, to intensify the brightness, and downwards to reduce it. The arrow on the adjusting ring (2) shows the current setting on the five-stage bar widening towards the top.
This varies the level of brightness while it continues to automatically adjust to ambient
light conditions.
To guarantee optimal working conditions, it is essential that the brightness sensor, which
is located behind the plastic plate, is not covered, not even while adjusting the brightness.
Please note that the control does not readjust in the near-dark and darkness, but a minimum brightness is set.
Battery Alert
If a low battery voltage is detected, a warning light will flash every 5 seconds.
Back-Up Battery Compartment
The second lithium battery CR2032 included in the scope of delivery is kept in a lid on
the cover for the adjustment units. A strong magnet holds the battery in its compartment.
You can loosen it by opening the compartment onto your palm.
Assembly
DOCTER® basic riflescopes have a 30 mm centre tube diameter, and are designed for
ring assembly. You have to choose the appropriate assembly based on the weapon
type. A local gunsmith or specialist dealer would surely be happy to advise you on the
optimal assembly option.
Reticle Adjustment
To adjust the reticle, unscrew the two protective caps (3) from the domes of the reticle
adjustment. Turn the handle elements underneath to change the hit point position; the
top dome for height, the right-hand dome for lateral adjustment.
Height Adjustment (H) (4)
Turning the handle elements in direction of the arrow will shift the hit point upwards.
Lateral Adjustment (R) (5)
Turning the handle elements in direction of the arrow will shift the hit point to the right.
You can feel the limit of the adjustment range as an end stop. Always screw the protective caps (3) back onto the domes to prevent unintentional reticle adjustments and to
ensure water tightness. In doing so, please pay attention to the fit of the sealing rings
(6).
Loosening the Philips-head screw (8), you can turn the scale disc (7) so that both index
marks (9) are opposing each other, ensuring a quick recovery of your “shot in” zero position of the reticle when you are using different ammunition or loads.
The adjustment range for the hit point correction is well assessed. However, if scale
graduation is not sufficient, you should have a gunsmith check the mounting of the riflescope.
Zooming
You can easily adjust the zoom by turning the vario-ring (10) according to target range
and ambient light conditions.
The main zoom values are engraved on the vario-ring (10) for orientation, yet you can
set any continuous value in between while experiencing steady image quality, visual
acuity, and perfectly maintained hit point position.
Setting Visual Acuity
You can set the visual acuity by turning the outer eyepiece ring (11). A possible eye defect is compensated when the reticle is perceived clearly during relaxed seeing.
Eye defect compensation is up to ± 2.5 dioptre.
You should set the visual acuity generally while using the highest zoom because it best
lets you evaluate the visual acuity due to to maximum resolution. If you change the zoom
afterwards, it does not change the previous setting of visual acuity.
Accessories
One of the protective caps on the reticle adjustment is constructively designed larger.
With the help of a magnet, it serves as a compartment for a back-up battery of the format CR2032.
Several linked protective caps are delivered to protect the optical parts standing out.
If you wish, we can deliver a telescope rubber light protection shield that ensures accurate distance from eye to eyepiece and would soften possible recoil.
Maintenance
You should protect the device from major soiling.
If necessary, carefully clean the optical surfaces with a soft, clean cloth or hair pencil.
Major soiling should be removed using distilled water to prevent limescale on the surfaces. You can use spirit or customary window cleaner to remove grease from the lenses.
Please note that removing parts of the riflescope will diminish tightness and nitrogen
filling of the device.
In case of damage impairing functionality, you have to send the device to an authorised
service workshop.


