Products:
- https://www.optics-trade.eu/en/zeiss-z-point-weaver.html
- https://www.optics-trade.eu/en/zeiss-z-point-picatinny.html
- https://www.optics-trade.eu/en/zeiss-z-point-sauer-303.html
Victory Z-Point / Z-Point Sauer 303 Victory Z-Point / Z-Point Sauer 303 / Z-Point Blaser F3
We congratulate you on your outstanding new Z-Point sight.
The Carl Zeiss brand is famous for outstanding optical achievements, precision workmanship and long service life. Please observe the following instructions for use in order to obtain the best from your Z-Point and to ensure that it remains your constant companion for many years to come.

Information for your safety
Caution
Use only battery types recommended by the manufacturer. Handle used batteries in accordance with the manufacturer’s instructions. Under no circumstances should batteries be thrown into a fire, heated up, recharged, taken apart or broken open.

The Z-Point is a red point sight (reflex sight) with simple magnification.
It is suitable for rapid and accurate aiming of handguns.
The simple magnification (1:1) allows the weapon to be aimed with both eyes open, thus enabling the person firing the weapon to see the full field of vision and so have the greatest possible view of the scene.
Power supply
The Z-Point has a dual power supply.
-
A solar cell
-
A battery (a Lithium CR 2032 battery
The solar cell (Fig. 1/A) supports the battery’s power supply to the Z-Point, extending its useful life (when light conditions are favourable) many times over.
However, the Z-Point will only work when a battery is installed.
Automatic switch-off function
The Z-Point will switch off automatically after operating for 4 hours in order to prevent the battery from unintentional discharge.
Inserting the battery
Remove the battery compartment cover (Fig. 1/B) by turning to the left (counter-clockwise). Insert the battery with the + side towards the cover. The battery cover can be opened with a coin.
If the instrument is not to be used for a lengthy period, the battery should be removed to prevent damage caused by leakage from the battery.
The Z-Point is still water-proof when the battery compartment is open. This prevents water from penetrating into the sight if you have to change batteries in wet weather.
Operation
Press the function button (Fig. 2/B) briefly once to switch the Z-Point on. When you switch on, the brightness of the red target dot is automatically adjusted to suit the ambient brightness.
Automatic brightness control
The Z-Point automatically adjusts the brightness of its target dot as light conditions change. However, the user can adjust the brightness to suit his/her individual requirements.
Manual brightness control
The brightness of the target dot can be adjusted to suit individual requirements by using the function button.
The function button is under the Zeiss logo (Fig. 2/B) and operates a number of functions:
- X Press the function button briefly
- O Press the function button until the required function or dot brightness is reached (about 1 second for function number 2)

- Note: To be sure that the control system operates properly, make certain that the sensor (Fig. 1/C) is not covered.
Mounting the Z-Point for Picatinny and Weaver rails to the weapon
The Z-Point is mounted on a Picantinny rail (MIL-STD 1913) or a Weaver rail.
Clamp
The Z-Point is fitted with a patented spring clamp. It can therefore be mounted on the rail without the use of tools.
Installing the Z-Point
Place the Z-Point with the side with the push-button for the spring clamp against the rail so that the rear edge of the housing (Fig. 3/E) fits into a transverse groove on the rail.
Press the push-button (Fig. 4/F) and at the same time guide the Z-Point in the direction of the arrow (Fig. 4) over the rail until the Z-Point clearly locks into position on the rail.
Removing the Z-Point from the rail
Follow the above directions but in the reverse order – press the push button for the spring clamp and move the Z-Point in the opposite direction to the arrow (Fig. 4).
Mounting the Z-Point S on Sauer 303 self-loading rifle
The Z-Point S features a special spring clamp and can be directly mounted to the Sauer 303 self-loading rifle without additional assembly components. It is possible to mount the Z-Point S on the Sauer 303 on both the front (Fig. 6) and back (Fig. 7) of the rail.
Lift the safety lever (Fig. 5/J), place the push button (Fig. 4/F) side of the Z-Point S against the weapon rail so that both crosspieces (Fig. 5/K) on the slide clamp of the Z-Point sit in the groove of the weapon rail. Press the push button (Fig. 4/F) and guide the Z-Point S over the rail in the direction of the arrow until it locks into place.
Lower the safety lever (Fig. 5/J). The safety lever (Fig. 5/J) limits the movement of the slide clamp, thus protecting the Z-Point S from being unintentionally knocked off.
Removing the Z-Point S from the rail
Lift the safety lever (Fig. 5/J), press the push button (Fig.4/F) of the spring clamp and remove the Z-Point in the opposite direction of the arrow (Fig. 4).
Mounting the Z-Point F3 on a Blaser Flinte F3
The Z-Point F3 has a groove in the form of a dove-tail which exactly fits the rail of the Blaser F3 Flinte. Push the Z-Point F3 along the rail (Fig. 8/M) until it meets the end-stop; tighten both M4 socket head screws (Fig. 8/L). To remove the Z-Point F3, unscrew both screws (Fig. 8/L) and slide the Z-Point towards the rear.
Adjusting the target dot
The Z-Point is adjusted for height and lateral variation by use of the adjustment screws (Fig. 2/G and H). The two protective covers over the adjusting screws must be removed to make any adjustments.
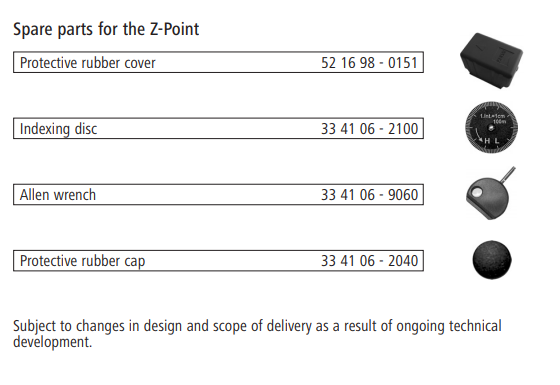
Use the Allen wrench supplied to do this.
Place the indexing disc on the Allen wrench. In order to avoid possible parallax errors when reading off, the indexing disc should be pushed as far as possible towards the housing after the Allen wrench has been placed in position.
A prominent edge of the Z-Point housing can be used as a reference point Techn
when reading off the divisions.
(1 division on the indexing disc = 1 cm/100 m).
Note the variation between the target dot and the point of impact during shooting and correct as follows:
-
Point of impact below the target dot
-
(the weapon is shooting low): turn the adjusting screw in direction H/U
-
Point of impact above the target dot
-
(the weapon is shooting high): turn the adjusting screw in direction T/D
-
Point of impact to the left of the target dot
-
(the weapon is shooting to the left): turn the adjusting screw in direction R
-
Point of impact to the right of the target dot
-
(the weapon is shooting to the right): turn the adjusting screw in direction L
Note: The adjusting screws are provided with an integral circular seal. The adjusting screws do not need to be tightened further after adjustment.
The interior of the Z-Point is exposed to the effects of the environment if the adjusting screws are completely removed.
Care and maintenance
A Carl Zeiss Z-Point needs no special care.
Do not wipe off coarse dirt particles (e.g. sand) from the lenses, but blow them off or remove them with a soft brush.
Fingerprints on the lens surfaces may affect them in the course of time.
The easiest way to keep the lenses clean is by breathing on them and wiping with a soft optical cleaning cloth or optical cleaning paper.
To avoid a possible fungal coating which is common in the tropics, store the optics in a dry place and always ensure good aeration of the lens surface.
Important
The cover of the solar cell is made from a transparent plastic which is extremely resistant to impact; it is also resistant to the usual cleaning materials.
You must not use any cleaner with a high alcohol content (or solvent) to clean the transparent plastic, the housing or attachments.
Never look at the sun or a laser light source through the Z-Point. This can lead to serious injury to the eye.