Check out Swarovski dS riflescopes models here:
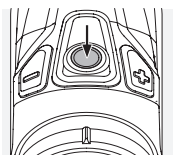
OVERVIEW
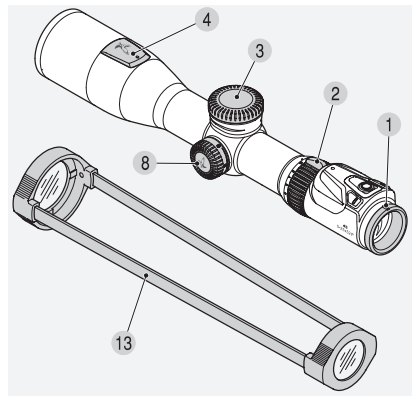
- 1 Diopter adjusting ring
- 2 Magnification adjustment ring
- 3 Battery cover
- 3.1 Battery (CR 123)
- 3.2 Adjusting tool
- 3.3 Torx screwdriver
- 4 Elevation adjustment cover
- 5 Elevation adjustment
- 6 Windage adjustment cover
- 7 Windage adjustment
- 8 Parallax turret
- 9 Measurement button
- 10 Brightness control for reticle illumination +
- 11 Brightness control for reticle illumination –
- 12 LED Bluetooth®*
- 13 Transparent scope covers
*Bluetooth is a trademark of the Bluetooth SIG, Inc.

Watch our review below
OPERATION
ADJUSTING THE FOCUS

Simply turn the diopter adjusting ring to achieve the best focus for your individual setting of the reticle. First turn the diopter adjusting ring all the way to the left (counterclockwise) and then to the right, until the reticle is optimally focused. Once the reticle is sharply focused, the display will also be sharp.
CHANGING THE MAGNIFICATION

You can set the desired magnification by turning the (stepless) magnification adjustment ring through 180°. The scale on the adjustment ring allows simple and easy reading of the setting. The soft, ribbed covering of the adjustment ring has a nose for better orientation. When the magnification is changed, the aiming point and windage marks position will adapt accordingly.
THE RETICLE IN THE SECOND IMAGE PLANE (EYEPIECE IMAGE PLANE)

If the magnification increases, then the reticle remains the same size – the size of the image is increased but not the size of the reticle and the display. Even for large magnifications only a little of the target is covered.
OPERATION OF THE PARALLAX TURRET

Using the parallax turret, you can adjust the optimum focus for every target distance thus preventing aiming errors due to parallax. The parallax turret can be set from 50 m to infinity. Set the magnification as high as possible and turn the parallax turret until the image appears at its sharpest. Now move your eye from side to side within the range of the exit pupil. If the reticle moves off the target, correct the parallax setting until the reticle stops moving against the target.
OPERATION OF THE RETICLE ILLUMINATION
On/Off switch
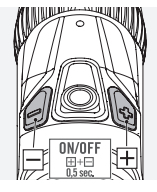
To turn on the reticle illumination, press the plus/ minus buttons simultaneously for half a second.
Brightness control
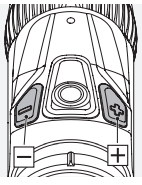
Once the reticle illumination is turned on, you can now adjust the brightness by means of the +/– buttons and select the setting of your choice from among 64 brightness levels. Keep the button pressed (constant impulse) to rapidly find the optimum brightness, to adjust finely press the button once (single impulse).
Switching off
To turn off the reticle illumination, press the plus/ minus buttons simultaneously for a second.
DISPLAY WITH FUNCTIONS AND WARNINGS
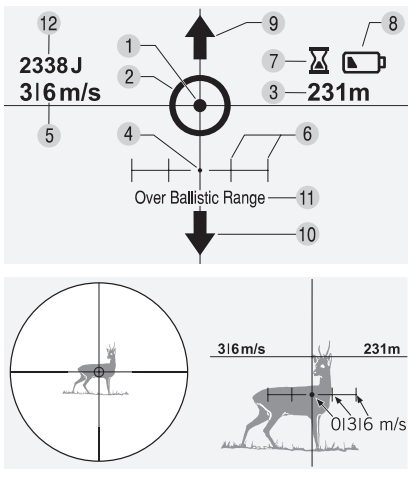
1 Illuminated reticle
2 Aiming mark
An illuminated circle, the aiming mark, appears after you press the measurement button briefly (see Point 2.7 “Measurement of distance and aiming point correction”).
3 Distance
You can set the precisely measured distance to meter or yard in the App.
4 Correct aiming point
Measurement, see Point 2.7 “Measurement of distance and aiming point correction”.
5 Wind speed
You can select between 2 wind speeds and between metric or imperial data in the App.
6 Windage marks
The distances between the wind marks result from the distance and the ballistic data of your firearm-ammunitions combination. They can be individually selected in the App.
7 Time-out warning
An hourglass symbol appears 10 seconds before 24 dS / EN dS / DE dS / EN dS / DE 25 the deactivation of the display (setting, see Point 2.9 “Automatic turn-off function”).
8 Battery warning
When the battery symbol appears, the battery must be replaced. Approximately 100 measurements are still possible. The dS can of course still be used with the reticle display off at any time
9 and 10 Arrow up/down
The aiming point is located above/below the display. If you reduce magnification, the aiming point will become visible again.
11 Over Ballistic Range
The aiming point cannot be calculated, this may have the following reasons: Measurement distance > 1024 m, angle > 45 ° up to 600 m, angle > 30 ° between 600 and 1024 m.
12 Knock-down-power (optional)
The knock-down power is automatically given in Joules/foot pounds for the measured distance dependent on your ballistic data. The display data can be switched on/off via the App and dimensions changed between metric and imperial.
Note:
In general, the App can be used to set and configure various settings/changes (e.g. Meter/Yard, windage marks, knock-down power, selection of displayed elements, duration of display, etc.).
MEASUREMENT OF DISTANCE AND AIMING POINT CORRECTION
An illuminated circle, the aiming mark, appears after you press the measurement button and the measuring function is activated. If you release the measurement button, the measurement is triggered and the aiming point calculated from your entered data will appear. The reference mark is the central aiming point of the physical reticle.
The instrument measures the exact distance and immediately calculates the exact aiming point using the set magnification, the air pressure, temperature and angle.
Note: Due to the laser safety standards applicable to bystanders, no more than 3 measurements can be implemented within 10 seconds. A further measurement is only possible again after 7 seconds.
RANGE
The following factors have an impact on the maximum measurement range:

Note: SWAROVSKI OPTIK accepts no liability if the dS laser affects or damages other instruments (e.g. night vision attachments, etc.).
AUTOMATIC TURN-OFF FUNCTION
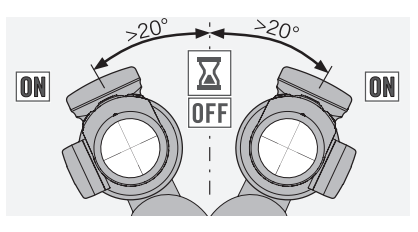
The reticle illumination and display turn off after 40, 60 or 80 seconds (the time can be pre-set in the App). A warning signal appears 10 seconds in advance. Press the +/- button or tip the dS by 20 degrees left or right to increase the display duration by the pre-set period of time. If the display turns off, the measurement button must be pressed again to activate it.
CHANGING THE BATTERY

- Turn off the reticle illumination.
- Unscrew the battery cover in a counterclockwise direction.
- Remove the old battery.
- When inserting the new battery (type CR 123), please make sure that the side marked “+” is in the correct position (see marking on the instrument).
- Screw the battery cover back on in a clockwise direction.
In need of a CR123 battery?

Batteries
Batteries must not be disposed of as household waste and you are legally obliged to return used batteries. Local facilities exist for returning used batteries free of charge (e.g. In retail outlets or at communal collection points). Batteries are labeled with a crossed-out wheeled bin. Please help us to protect our environment from damaging pollutants.
BATTERY OPERATING HOURS
Consult the technical data sheet enclosed!
WEEE/ElektroG

This symbol indicates that this product must not be disposed of as household waste under the WEEE Directive (Waste Electrical and Electronic Equipment Directive) and national laws. This product must be returned to a dedicated collection site. You can obtain information about collection sites for waste equipment from your local authorities or from an authorized site for the disposal of waste electrical and electronic equipment. Disposing of this product correctly helps to protect the environment and prevents potential damage to both the environment and human health which could occur if the products are not handled correctly.
SIGHTING THE RIFLE SCOPE IN
BASIC ALIGNMENT
To ensure perfect alignment of the scope to the rifle, please have a competent gunsmith mount the scope. The reticle has been factory-set to the mechanical middle position.
Note:
When mounting the rifle scope onto the rifle, please make sure that you comply with the eye relief specified (see technical data sheet).
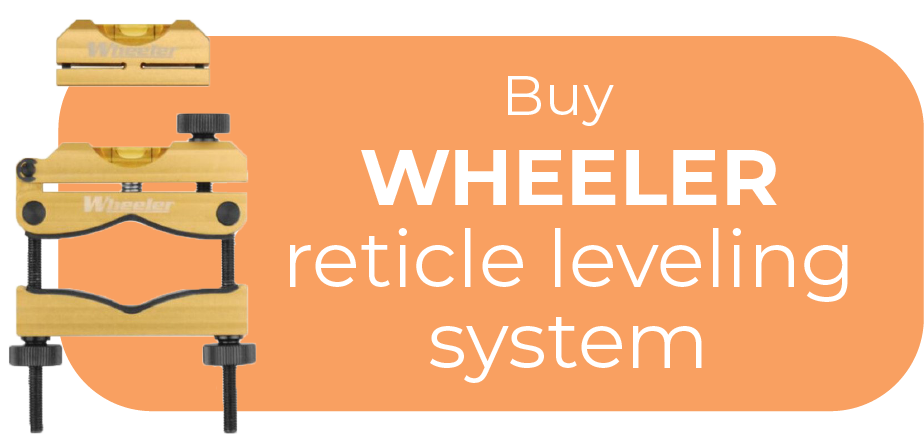
To help you level the reticle – check out this tool!
ALIGNMENT OF THE SCOPE TO THE RIFLE
If the point of impact of the bullet deviates from the aiming point, this can be easily and precisely corrected by adjusting the elevation turret and the windage turret of the scope. Regardless of corrections, the middle point of the reticle always stays in the middle of the field of view.
PREPARATIONS FOR SIGHTING THE RIFLE SCOPE IN
Before sighting the rifle scope in, please make sure that the following parameters are set correctly:
- Diopter adjustment
- High magnification
- Parallax
A technical data sheet with a formula for sighting in can be found in the pocket of the user manual. When correctly completed, this will help you enter your personal values for the rifle, ammunition, etc. in the App. The dS operates with a high degree of precision, which means that you need to provide accurate data. To obtain an accurate aiming point, we recommend you measure the actual muzzle velocity from your barrel using the desired load.
Need help with zeroing your riflescope? Watch the video below.
ELEVATION AND WINDAGE ADJUSTMENT
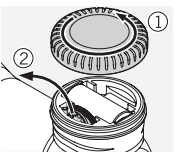
1. Open the battery cover and remove the torx screwdriver and the adjusting tool.

2. The covers of the elevation and windage adjustment can be opened with the provided torx screwdriver (TX 6). You can then adjust the elevation and windage adjustment when open with the adjusting tool.
3. Elevation adjustment: Turn the adjusting tool in the middle of the elevation adjustment.
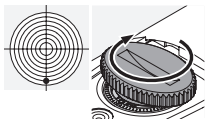
a) … clockwise if a shot is low, or

b) … counterclockwise if the shot is high for the required impact point correction (1/4 MOA; 7 mm/100 m or 0,25 in/100 yds).
4. Windage adjustment: Turn the adjusting tool in the middle of the windage adjustment…

a) … clockwise for a shot to the left, or

b) … counterclockwise for a shot to the right for the required impact point correction (1/4 MOA; 7 mm/100 m or 0,25 in/100 yds)
5. Use the torx screwdriver to screw the covers back on, then place the screwdriver and adjusting tool back in the top turret.
You will find the impact point correction per click on the enclosed technical data sheet or written on the elevation adjustment or windage adjustment of your rifle scope.
CONFIGURING THE RIFLE SCOPE WITH THE APP

1. Install the Configurator App on your smartphone/ tablet (Android or iOS).
2. Activate Bluetooth® on the smartphone and the dS. To do this, press the +/- button on the rifle scope for 3 seconds until the LED flashes.
3. Connect the smartphone and dS via Bluetooth®. Use the serial number located on the bottom of the eyepiece for this purpose.
4. Enter the sighting in values recorded on the technical data sheet correctly in the App.
5. Finally, transfer the data back to the dS.
6. Press the +/- button again for 3 seconds to switch Bluetooth® off again on the dS.
Note:
SWAROVSKI OPTIK accepts no responsible for ensuring that the caliber data displayed in the App is correct; each customer is responsible for checking this data.
TIPS AND TRICKS FOR MOUNTING RIFLE SCOPES
Nowadays, there is an enormous choice of technically advanced rifle scope mounts which allow rifle scopes to be attached securely to firearms. By using the right tools and amount of effort, desired levels of stability and accuracy can be achieved. Please read the installation instructions provided by the individual manufacturer carefully. These contain detailed information about the appropriate tool to use and a few tips and tricks to make installation easier.
Here a number of examples:
- Depending on the type of mount (please read the particular manufacturer’s instructions), when fitting the mount base it may be helpful to remove the finish from the contact surfaces, then degrease them and, when screwing the contact surfaces into place for the final time, first coat them with a suitable adhesive.
- If necessary, you can readjust the rings to make sure that the fitting is perfectly centered, e.g. by lapping the rings.
- Also degrease the clamping surfaces and inner sides of the rings and apply a suitable adhesive to at least the lower halves of the rings for complete stability when shooting.
- Please take particular care when adjusting the reticle.
- Eye relief distance: The correct eye relief distance for the rifle scope can be found in the technical data. Individual settings and adjustments allow users to achieve an optimum field of view and a comfortable firing position.
- Torque: Tighten the screws for the rings on both sides to a maximum 200 Ncm/17.7 inch pounds. This ensures that the tubular bodies are not placed under unnecessary pressure and guarantees accurate, tension-free installation. To obtain the right amount of force, a torque wrench is recommended. Under no circumstances should the rings be tightened instead of sticking together the bottom halves of the rings, which is an essential step.
We suggest using a torque driver to properly mount your riflescope

If the right tools are used with the right amount of force and the manufacturer’s instructions are followed closely, the rifle scope should require little correction when focusing in to shoot. Use the individual components to obtain the highest levels of accuracy for your chosen firearm/mount/ rifle scope combination. SWAROVSKI OPTIK provides no guarantee that the content of this page is correct, current or complete.
FURTHER INFORMATION
You will find comprehensive information and tips at: WWW.SWAROVSKIOPTIK.COM
More information about compliance can be found at: http://docs.swarovskioptik.com/ds_compliance.pdf
CARE AND MAINTENANCE
CLEANING CLOTH
The special microfiber cloth can be used to clean even the most sensitive glass surfaces. It is suitable for objective lens, ocular lens and spectacles. Please keep the cloth clean, as dirt can damage the lens surface. If the cloth becomes soiled, it can be washed in lukewarm soapy water and left to dry. Please use it exclusively for cleaning lens surfaces.
Are you missing proper cleaning supplies?

CLEANING
We have designed all elements and surfaces to require little care. The SWAROCLEAN nonstick outer surface coating makes it much easier to clean objective lenses and eyepiece lenses, especially of any dried-on mineral deposits (e.g. water marks from condensation), insect repellents and tree resin.
To ensure the long-lasting optical brilliance of your rifle scope, you should keep the glass surfaces free from dirt, oil and grease.
To clean the lens, first remove larger particles with an optical lens brush. For the subsequent thorough cleaning we recommend breathing lightly onto the lens and then cleaning it with the moist cleaning cloth. It is recommended to clean the metal parts with a clean, soft cleaning cloth.
STORAGE
You should keep your rifle scope in a well-ventilated, dry, dark place. If the rifle scope is wet, it must be dried prior to storage.
FOR YOUR SAFETY!
WARNING!
The product meets the requirements of a Class 1 laser pursuant to the applicable standards EN 60825-1, IEC 60825-1, FDA 21 CFR 1040.10 and 1040.11 respectively except for deviations pursuant to Laser Notice No. 50, dated June 24, 2007. As such, the instrument is safe for eyes and can be used for any application, but must not be aimed at people directly.
GENERAL INSTRUCTIONS

Never use the rifle scope to look at the sun! This will damage your eyes! Please protect your rifle scope from unnecessary solar radiation. Never point the instrument at people from close distances!

Please note the eye relief distance specified for a mounted rifle scope (see technical data sheet for dimensions).

Please protect your rifle scope against knocks.

Repair and service work shall only be carried out by either SWAROVSKI OPTIK Absam (Austria) or SWAROVSKI OPTIK North America and any work by non-authorized parties shall render the warranty void.
SEALING
Thanks to the use of high-quality sealing elements and controlled fabrication processes, our rifle scopes are watertight and gas-tight to a pressure of 0.4 bar or a depth in water of 4 m. Seal integrity is guaranteed even when the cap has been removed. Nevertheless, careful handling is advised, especially around the turrets. The scope has been filled with inert gas via the sealing screw located underneath the rifle scope. Please do not loosen this sealing screw!


I believe the Nikon Prostaff 5 is one of the best you can get for the money. I have one on my .375 Ruger Hawkeye and another one on my .308 Remington 700 SPS. Using Nikon’s spot on app has been very helpful.
The bullet data Swarovski use for this scope is a waste of time, Only go with chrono data, and even then its flawed. had issues with this scope from the start. Swarovski can you do a chrono video now, its vital for this scope.
I have two questions. What brand of rings and bases do you have on it? And are they medium or high rings?
Thanks for the instructions.
Where can I obtain information or instructions using the “advance” feature of the app.
We suggest you check out Swarovski’s homepage:
https://www.swarovskioptik.com/int/en/hunting/products/rifle-scopes/ds