Product:
INTRODUCING THE 4-14X44 FFP ARC-2 MOA
The 4-14×44 Front Focal Plane scope is a proven tough rifle optic featuring clear glass, side focus parallax adjustment, red partial reticle illumination, and resettable target turrets. Both the reticle dimensions and turret adjustments are measured in Minutes Of Angle (MOA) for easy zeroing and shooting.

ACHIEVING A CLEAR RETICLE PICTURE
Your 4-14×44 FFP MOA scope comes with an adjustable diopter ring that must be set to match your eye. Located at the rear of the eyepiece, it is marked simply [+ 0 -]. The diopter ring changes the focus of the reticle as you see it inside the scope. It does not change the focus of objects that you look at through the scope. Setting the diopter is the critical first step to successful precision shooting. You can set the diopter before you have even mounted the scope in its rings.
- Turn the Power Ring to the highest setting, 14x, and point the scope at a bright, featureless background such as blue sky or a blank white wall.
- Turn the Parallax Adjust Knob to infinity [∞].
- With your head in position behind the scope’s ocular lens, look at the wall or sky instead. If you look through prescription glasses when shooting, wear them now too. After 5 or 6 seconds, close your eyes.
- Now open your eye, glance through the scope and immediately see if the reticle is sharp or blurry. If you notice that the reticle seems blurry at first and then suddenly sharpens, your eyes have focused on the reticle itself instead of looking through the scope. You must adjust the diopter ring and try again.
- If the reticle was blurry, turn the diopter ring and repeat the process again. The process will take multiple adjustments. Each time you repeat the process, ask yourself if the reticle was sharper or more blurry than before. The final adjustments may be very fine. If your eyes get watery or tired, walk away for a bit and come back to this later.
- Once the reticle appears sharp as soon as you glance through the scope, the diopter is set for your eyes. Everyone’s eyes are slightly different, so the ideal adjustment changes from person to person. Many shooters will mark their correct diopter position with a little dab of paint or fingernail polish next to the 0 mark, in case the ring gets turned accidentally later on. Others will apply electrical tape around the diameter of the ring to hold it in place.
ADJUSTING PARALLAX
The Parallax Adjust knob is located on the left side of the scope, marked with ranges from 10 yards to infinity. Although it is often referred to as a “side focus” knob, parallax and focus are not the same thing. Parallax error occurs when the target’s image and the reticle are not aligned on the same focal plane inside the scope. Think of a mechanical car speedometer that seems to indicate a slightly different speed when you look at it from the passenger seat. Because the needle is positioned between you and the dial numbers, moving your head around changes where it seems to point. This creates an inconsistent picture depending on your point of view. Adjusting the Parallax Adjust knob eliminates parallax error at different ranges by bringing the reticle into the same focal plane as the target, like a digital speedometer displayed on a flat screen. Parallax error is most noticeable at high magnifications. Adjustment is much easier with your rifle secured by sandbags or a bipod.
- Turn the Parallax Adjust knob until the target appears to be in focus. This will get you close to the correct adjustment.
- Looking through the scope at the target, move your head just slightly from side to side. If you lose the sight picture you are moving too much. Go slowly, and see if the reticle appears to move relative to your target. A target that appears to be floating around the reticle as you move your head indicates parallax error.
- If the target appears to move in the opposite direction of your head, turn the Side Focus Knob counterclockwise. If the target appears to move in the same direction as your head, turn the Side Focus Knob clockwise. These adjustments are very small. Move the Side Focus Knob just a little bit at a time and re-check.
- Once the reticle and target hold their positions as you move your head from side to side, parallax error is eliminated for targets at this range. Normally this adjustment will also keep the target nicely in focus. However, to gain the most consistent hits on target, it is more important to eliminate parallax error than to have the target perfectly in focus.
RETICLE ILLUMINATION
The Reticle Illumination knob on the left side of the scope is marked with numbers of increasing brightness from 1 to 6. Between each number is an OFF setting. The cap unscrews counter-clockwise, holding a CR2032 battery with the positive (+) side facing towards the cap. Reticle illumination at the lower settings is useful in low light situations like sunrise and sunset. At the higher settings reticle illumination provides a quick aiming point even in daylight, especially at low magnification.
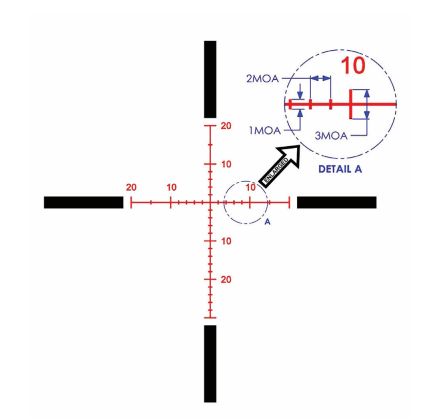
UNDERSTANDING THE ARC-2 MOA RETICLE
The ARC-2 MOA reticle extends 20 MOA left, right, and above the center cross hair. Large hash marks are found 10 and 20 MOA distance from the center, with smaller hash marks in between them at 2 MOA increments. Increments extend all the way to 30 MOA below the crosshair to assist with holdover shooting at longer ranges. Small hash marks measure a total of 1 MOA, with .5 MOA above and .5 MOA below the crosshair line. Large hash marks and the black posts measure 3 MOA, with 1.5 MOA above and 1.5 MOA below the crosshair line. These measurements are indicated in blue on the diagram below.
Adjusting Point of Impact
When sighting in your rifle, we recommend shooting from a supported position with a bipod or sandbags. If your shots are hitting low, turn the elevation turret counterclockwise to bring the point of impact up. If your shots are hitting to the left, turn the windage turret counter clockwise to bring the point of impact right. Each turret click will change the point of bullet impact 1/4 minutes of angle (MOA), or approximately 0.25 inches at 100 yards distance.

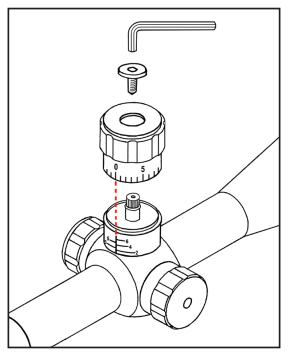
Resetting Turret Position
You can reset your turret positions to read “zero” after sighting in your rifle. Using the supplied 3mm Allen head wrench, turn the locking screw counter clockwise and remove it. Carefully pull the outer turret straight away from the scope tube until it comes completely off. Line up the 0 mark with the center line underneath, and press the outer turret straight towards the scope tube to reinstall. Finger pressure is all that is needed. With the outer turret reinstalled, hold it still with one hand while tightening the locking screw with the other hand. Do not over torque the locking screw.
Ranging using the ARC-2 MOA Reticle
Due to the front focal plane design of this optic, the reticle’s measurements are always true regardless of magnification setting. Ranging using the ARC-2 MOA Reticle is simple if you can apply the following formula:
Target’s size in inches x 100 / MOA = distance in yards
Multiply the target’s size in inches by 100. Looking through the optic, observe the target’s apparent size compared to the reticle’s hash marks. Divide the result of (target size inches x 100) by the target’s apparent size in the reticle to find the distance in yards.
For example, our target is a cardboard disk measuring roughly 30 inches in diameter. Looking through the optic, we observe that it appears 8 MOA tall.
30 inches x 100 = 3,000/ 8 MOA = 375 yards
Our target is 375 yards away.
Bullet drop compensation using the ARC-2 MOA Reticle
The ARC-2 MOA reticle can be used to compensate for bullet drop at various distances without counting turret clicks, using the holdover method. You need a ballistic chart showing your caliber’s drop at various distances. Ballistic charts for common calibers and barrel lengths are available online. Precision shooters will create their own charts using a chronograph and ballistic calculator.
Most ballistic charts show bullet drop in inches rather than MOA. To hit the cardboard disk ranged above, we reference a ballistic chart that shows our bullet dropping 60 inches at 375 yards if the rifle is sighted in at 100 yards. First, we need to know how many inches one minute of angle will cover at that distance. We use the following formula:
Distance in yards x 1.047 / 100 = inches per MOA at that distance
We calculated our distance at 375 yards.
375 yards x 1.047 = 392.6
Divide 392.6 by 100= 3.92 inches per MOA at 375 yards.
We need to adjust for 60 inches of drop at 375 yards. Knowing that 1 MOA
= 3.92 inches at 375 yards, we simply divide the inches of bullet drop by the
inches per MOA at our distance.
Inches of adjustment needed / Inches per MOA at our distance = Adjustment in MOA
60 inches of drop / 3.92 inches per MOA = 15.3 MOA of bullet drop
At this point there are two methods to hit the target.
THE CLICK METHOD
The click method is to turn your elevation turret to adjust the reticle 15.3 MOA inside the scope. Each turret click measures ¼ MOA, so we use this formula to calculate how many clicks are needed:
Number of clicks per MOA x adjustment in MOA = number of clicks needed to adjust correctly
4 clicks per MOA x 15.3 MOA adjustment needed = 61.2
Obviously we cannot click the turret .2 of a click, so we round down and count 61 clicks of elevation change UP on the turret, and use the center of the crosshair as our aiming point. The click method is the most accurate method, but counting 61 clicks on the turret takes time
THE HOLDOVER METHOD
The holdover method is much faster, if slightly less precise, than the click method. The ARC-2 MOA reticle is designed with the holdover method in mind, extending an extra 10 MOA down from center. Knowing that we need 15.3 MOA of vertical adjustment for our 375 yard shot, we abandon using the center crosshair as our aiming point, and select a new aiming point 15.3 MOA below the crosshair, using the reticle’s hash marks. For a very fast, if slightly less accurate shot, we can forget the .3 and simply round down to 15 MOA of adjustment. Our point of aim will now look like this, without ever needing to count clicks on a turret.

ACCESSORIES AND MORE INFORMATION
The Primary Arms sun shade (PA4-14SS) is a useful addition to your 4-14×44 FFP-ARC2-MOA scope. The sun shade can prevent glare when shooting in bright sunlight at certain angles, and can keep water away from the objective lens in the rain. The sun shade easily screws into the objective bell of the scope with no tools needed.
For faster manipulation of the scope’s magnification function, 3 Gun Stuff offers a “Cat Tail” scope lever (GS-440), which attaches securely to the power ring.
SPECIFICATIONS AND FEATURES
• Tube diameter: 30mm
• Magnification: 4-14x
• Objective diameter: 44mm
• Ocular diameter: 36mm
• Exit Pupil: 11.2mm to 3.3mm
• Eye Relief: 80mm to 82mm
• Field of view: 27.2 feet @ 100 yards at 4x 7.9 feet @ 100 yards at 14x
• Click Value: ¼ MOA
• Total elevation adjustment: 60 MOA
• Total windage adjustment: 60 MOA
• Length: 13 inches
• Net weight: 24 oz.
• Red partial illumination
• Etched reticle visible with illumination off
• Fast focus eyepiece
• First focal plane
• Waterproof: 11 degrees C, 0.25m, 3 min/ 52 degrees F, 10”, 3 min
• Nitrogen purged
• Fog resistant
• Fully multi-coated
• 6063 aluminum
• Uses one CR2032 battery (included)
• Lens covers included
• 3 year warranty


